If you scroll down this page you see the big header with contact details scrolls out of view and is replaced by a smaller header that animates into place. Scroll up and it animates away. There are different animations for when the header comes in and when it goes away.
Why not use a third party script?
You can achieve effects like this using Tweenmax (and probably more) but if possible I like to keep things within Oxygen builder and if you're not loading up big script libraries (of which you'll use only a small part) then your overall page size will be needlessly large. It's much easier just to use a bit of jQuery.
A very simple example - a shrinking logo and header
Note, that I'm not a programmer. Better code is probably possible but if I can do it, then anybody can!
In this example, we'll animate a logo.
Step 1, make the template
Make a template and create a normal header in Oxygen. You can use the header builder or not. Make sure you add an inner content section to your template (under add - basics) and you have some content to preview. You'll need this as you'll need to test scrolling down. If you have no content then you can't scroll down.
Add the class "shrinklogo" to the logo. Add the class "fixheader" to the whole header.
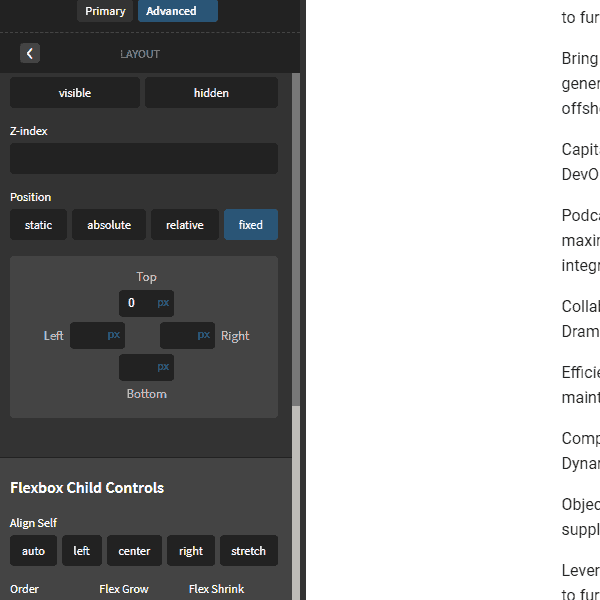
Make the header fixed in Oxygen by going to Advanced - Layout - Position - Fixed. Also put it at the top of the page by putting 0px at the top of the position.
Make the header fixed and use 0px for the top so it's at the top of the page.
Screen print from Oxygen builder
Important: Make sure you add a height to the logo and the header. Later we'll be animating the header height of these elements and if you don't start with a value, then it won't work.
In this example, I use 180px for the header and 96 for the log.
Step 2, the jQuery
Now we add the jQuery. Add a code block. Add - Basics - Code Block - JavaScript. And add the following code:
jQuery(document).ready(function(){

jQuery(document).scroll(function () {
var y = jQuery(this).scrollTop();

if (y > 180) //if scroll is great than 180 do the following
{

jQuery(".fixheader").css({"height": "100px", "top": "0px",});
jQuery('.shrinklogo').css("height", "80px");
}

//now the opposite

if (y == 0)
{

jQuery(".fixheader").css("height", "180px");
jQuery('.shrinklogo').css("height", "96px");

}

})
});
Let's take a look at the code quickly
We wrap everything in document ready to ensure that our code only loads up once the document is loaded so we optimise our load times.
Then we have a scroll function which means only when we scroll will we see the results and then we have a variable y which is the distance from the top.
That's the basis for a lot of stuff we can do. It says when you start scrolling measure the distance from the top. From that we can use if statements to do what we want.
With that in mind, the rest should be quite easy to see, we simply have if statements and we use the jQuery css function to inject css into our html elements.
You could also do this with the toggleclass function which is probably better and neater code but I prefer this method as I have less classes to remember.
You could also do this with the toggleclass function which is probably better and neater code but I prefer this method as I have less classes to remember.
Step 3, the CSS
Now your logo and heading will shrink but they won't animate nicely, this is because you haven't applied a transition. In this case we'll keep it fairly simple and apply the same animation to the expanding and shrinking parts.
If you don't have one already, add a custom stylesheet by going to Manage - Stylessheets - Add sytlesheets and add the following CSS:
We define the behaviour for the classes fixheader and shrinklogo together because we want them to have the same animation.
Here I've used 'all' meaning that all properties (e.g. height, width etc) will animate in the same way. And I have chosen a speed of .5 seconds and an animation that's faster at the end.
I hope you find the above tutorial. Using the same basic ideas you should be able to animate your headers any way you want all without any external code libraries.
We’re not young, trendy and creative. We get the job done.
We can see where your business can grow
It may be PPC. It may be local SEO. Our experience gives us insight.
We ‘re experts at finding the profititability sweet spot
When it comes to PPC, we know that spending more is not always best. We spend the right amount to make you the most money.
20+ years of experience each
Expertise comes from experience.
Find us Linkedin
We use cookies on our website to give you the most relevant experience by remembering your preferences and repeat visits. By clicking “Accept”, you consent to the use of ALL the cookies.
This website uses cookies to improve your experience while you navigate through the website. Out of these, the cookies that are categorized as necessary are stored on your browser as they are essential for the working of basic functionalities of the website. We also use third-party cookies that help us analyze and understand how you use this website. These cookies will be stored in your browser only with your consent. You also have the option to opt-out of these cookies. But opting out of some of these cookies may affect your browsing experience.
Necessary cookies are absolutely essential for the website to function properly. These cookies ensure basic functionalities and security features of the website, anonymously.
Cookie
Duration
Description
cookielawinfo-checbox-analytics
11 months
This cookie is set by GDPR Cookie Consent plugin. The cookie is used to store the user consent for the cookies in the category "Analytics".
cookielawinfo-checbox-functional
11 months
The cookie is set by GDPR cookie consent to record the user consent for the cookies in the category "Functional".
cookielawinfo-checbox-others
11 months
This cookie is set by GDPR Cookie Consent plugin. The cookie is used to store the user consent for the cookies in the category "Other.
cookielawinfo-checkbox-necessary
11 months
This cookie is set by GDPR Cookie Consent plugin. The cookies is used to store the user consent for the cookies in the category "Necessary".
cookielawinfo-checkbox-performance
11 months
This cookie is set by GDPR Cookie Consent plugin. The cookie is used to store the user consent for the cookies in the category "Performance".
viewed_cookie_policy
11 months
The cookie is set by the GDPR Cookie Consent plugin and is used to store whether or not user has consented to the use of cookies. It does not store any personal data.
Functional cookies help to perform certain functionalities like sharing the content of the website on social media platforms, collect feedbacks, and other third-party features.
Performance cookies are used to understand and analyze the key performance indexes of the website which helps in delivering a better user experience for the visitors.
Analytical cookies are used to understand how visitors interact with the website. These cookies help provide information on metrics the number of visitors, bounce rate, traffic source, etc.
Advertisement cookies are used to provide visitors with relevant ads and marketing campaigns. These cookies track visitors across websites and collect information to provide customized ads.